
In my previous post I discussed the importance of backing up testing your Open Dental data. This post will walk you through setting up a workstation as an Open Dental server to test your backups. Open Dental has some basic instructions on their website. You should review their instructions, too before proceeding with these instructions.
It’s been said before, and I’ll reiterate it here–a backup that isn’t tested and verified to be working properly is no backup at all. You’ve got to go through the process of making sure your backups are working. Plus, you’ll sleep better at night knowing your data is safe. So let’s get at it.
Setup a Workstation as an Open Dental Server
You can test your backups on your main server, but I suggest doing it on a different computer for a couple reasons. First, if you ever need to to replace your server you want to have gone through the process of restoring on a new machine. Second, it’s a good idea to have another computer ready to go as a pseudo-“hot spare” backup server.
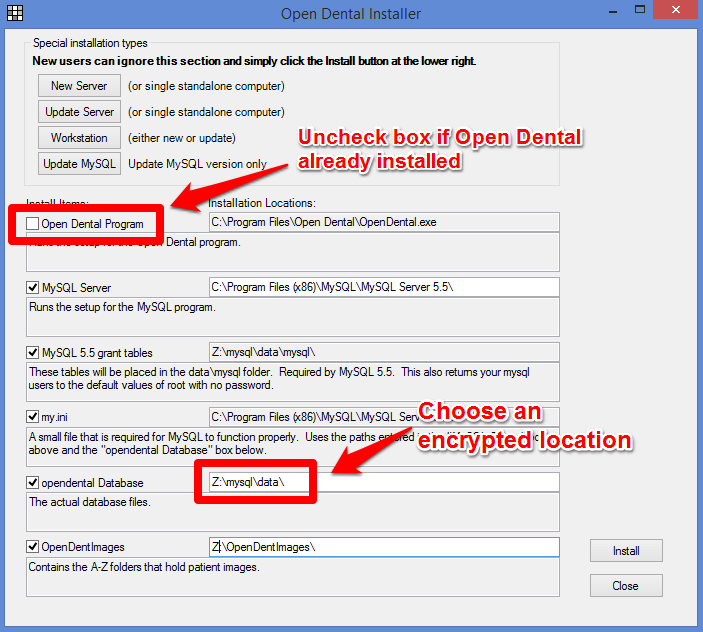
Open Dental makes this process extremely simple. The only file you need to get started is the Open Dental Trial Version. Once that file downloaded, right-click on it and choose “Run as administrator.” If you’re setting this up on a computer that already has Open Dental installed, uncheck the box for the Open Dental Program and choose a location for the database (see screenshot below). I like to put this in an encrypted virtual drive on the computer (more on this another time). Now click install.
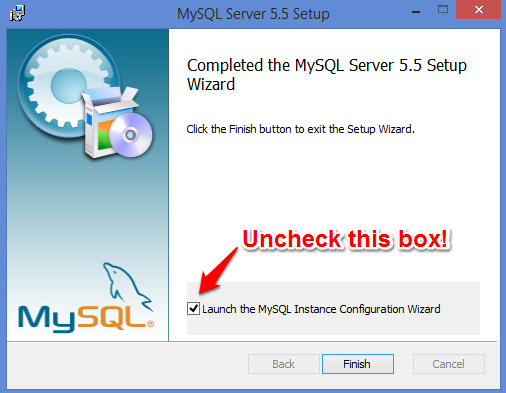
Click OK on the first box that pops up. Click next on the MySQL server install window, read and accept the terms and click next. Choose Typical setup type. Then you’ll click install. Click Next on the MySQL Enterprise and Enterprise Monitor windows. When you get to the window with an option to “Launch the MySQL Instance Configuration Wizard” be sure to uncheck that box before clicking Finish.
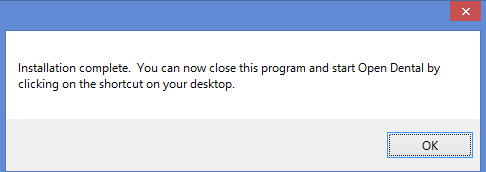
Click OK on the MySQL installed, Grant tables copied, my.ini, country settings, Database(s) copied, OpenDentImages, and MySQL service installed and started windows. If all goes correctly, you’ll see the Installation complete window seen below.
Run Open Dental Using Your Local MySQL Server
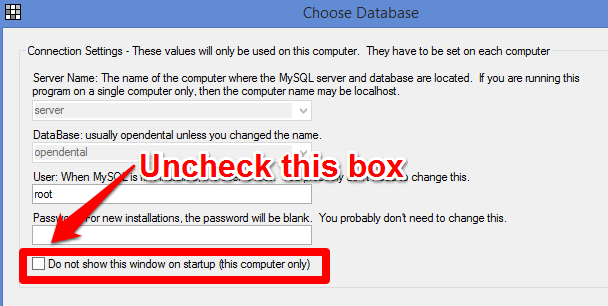
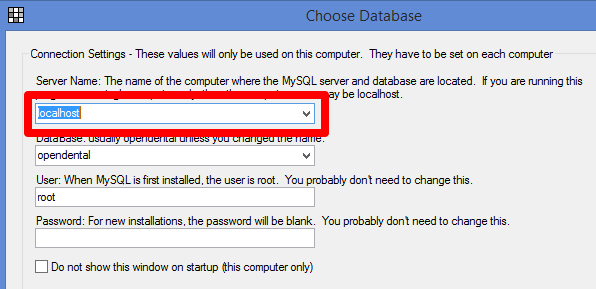
Now you need to connect to your local MySQL server instead of you main server. To do this you might need to first run Open Dental as an administrator. Close Open Dental then right-click on the Open Dental icon and choose “Run as administrator.” After you log in, click File | Choose Database. Make note of your current server name (you’ll need it again later) then uncheck the box labeled “Do not show this window.”
Also, you might need your registration key for your local copy, so before you close Open Dental get your registration key by clicking Help | Update | Setup. Copy the registration key and paste it into notepad. Close and relaunch Open Dental as administrator like before. You’ll see the same “Choose Database” window, but this time you’ll be able to type in a different server name. Type in “localhost” (minus the quotation marks),leave everything else the same, and click OK. This will tell Open Dental you want to use you local server.
You’ll likely get a notice that your database will be converted. If so, click ok. This process will simply be upgrading the sample database to the current version your running on your main server. After a few moments you’ll (hopefully) see a window saying Database update successful. Click ok on this window. If you get a notice that the AtoZ folder wasn’t found click OK then choose the folder that you created during the Trial Version Server setup. You’ll possibly need to enter your registration key, so paste the key you copied beforehand into the appropriate field. If all goes right, you should now be working with a blank database.
Restore Backup to Your Local MySQL Server
Assuming you backed up your data using Open Dental’s built in backup tool you can easily get your test database up and running. Now that you’re working with your local server (not your live database), you can do a test restore of your backup. Again, let me make this perfectly clear, YOU NEED TO BE 100% CERTAIN YOU’RE NOT WORKING WITH THE LIVE DATABASE ON YOUR MAIN SERVER.
From the Manage module, do the following: 1) Click Backup; 2) Check box to exclude image folder (optional depending on your preferences); 3) Set the paths to your backup and the local folder; and 4) Click Restore. AGAIN, BE SURE YOU ARE RESTORING TO YOUR LOCAL TEST MYSQL SERVER BEFORE CLICKING RESTORE.

You’ll be prompted to confirm that you want to restore from your backup. Click OK. After a few moments (or possibly longer) you’ll get a window that says Done. Click OK. Now you should have your data on your local machine! You will likely need to close then re-open Open Dental to get your appointment views to look the way they should. Once you’re convinced you successfully restored your backup you’ll want to set your workstation to use your main server’s database again. When prompted at startup just enter your server name as noted above.
Feel free to contact me or post a comment if you have any questions or additional ideas.
Hello Kevin Rossen, I really liked your update regarding open dental backups. Everyone should be aware of how much important is to keep backup of your data in today’s time. Your information will benefit everyone.